Introduction
Terraform is one of the most popular tools used by DevOps teams to automate infrastructure tasks. It is used to provision and manages any cloud, infrastructure, or service. A large percentage of Terraform users provision their infrastructure on the major cloud providers such as AWS, Azure, OCI, and others.
In this blog post, we will cover all in and out of terraform providers.
What is a provider?
A provider is a plugin that gives you a new set of resources and data for use in your Terraform code. They are responsible for understanding API interactions and exposing resources.
Terraform can provision infrastructure across public cloud providers such as Amazon Web Services (AWS), Azure, Google Cloud, and DigitalOcean, as well as private cloud and virtualization platforms such as OpenStack and VMWare. Depending on what type of infrastructure we want to launch, we have to use appropriate providers accordingly.

How do I get a provider?
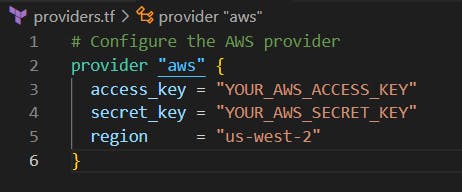
Providers are written in Go and published on the Terraform registry for clients to install and use. Clients can declare a new provider in their code using a provider block, which tells Terraform to install and use that provider. There may be configuration required in the provider block, such as passing in an API key. Here’s an example AWS provider declaration with an access key and secret key passed in:

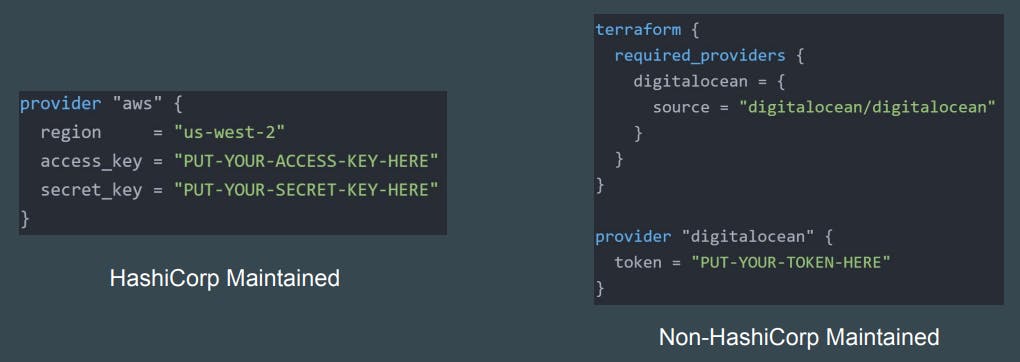
Terraform requires explicit source information for any providers that are not HashiCorp-maintained, using syntax in the required_providers nested block inside the terraform configuration block.

Required providers
All declared providers must be configured in a required_providers block. This block is nested below the terraform block and it takes the provider’s local name (this is the name you gave the provider when you declared it, so in our example, it would be datadog), and the source and version as an argument. You can read more about this configuration block in the Terraform documentation. The format looks like this:
terraform {
  required_providers {
    local_name = {
      source = "foo/bar"
      version = "1.0.0"
    }
  }
}
The required_providers block can take more than one provider configuration if you happen to be using more than one provider in your Terraform. Here’s an example of configuring the AWS and Datadog providers:
terraform {
  required_providers {
    aws = {
      source = "hashicorp/aws"
      version = "~> 4.6"
    }

    datadog = {
      source = "DataDog/datadog"
    }
  }
}
Provider versions
Notice that the versions are all specified in different ways. You can pin a specific version, allow flexibility in the minor or patch versions, or leave the version unspecified and just use the latest. Terraform’s provider versioning is syntactically similar to a Gemfile or a package.json file, and much like those package management systems, Terraform is capable of generating a lock file for your provider versions. If you run "terraform init" in the directory where your root Terraform file is, you’ll see a .terraform.hcl.lock file generated which can then be stored in version control.
AWS Provider
To use Terraform to manage and deploy resources and infrastructure to AWS, you will need to use the AWS provider. You must configure the provider with the proper credentials before you can use it. This provider is maintained internally by the HashiCorp AWS Provider team.
To install the AWS provider, the example configuration below can be used (usually in your main.tf file):
terraform {
  required_providers {
    aws = {
      source = "hashicorp/aws"
      version = "5.2.0"
    }
  }
}

provider "aws" {
  # Configuration options
}
Note that the version of the provider is ‘pinned’ here to “5.2.0” (the latest at the time of writing). This is recommended best practice to avoid any unexpected changes in behaviour between provider versions. Newer minor versions should be backwards compatible and not introduce issues, however, major version updates may introduce breaking changes. Pinning the version allows you to update manually when you are confident there will be no adverse effects in doing so.
To find the latest version available, check out the Terraform docs page, or the GitHub page. GitHub will also give you a version history and details on issues raised by community members and stakeholders.
AWS Provider Configuration Options
The configuration options that can be specified in the provider block are all optional for the AWS provider. As well as the general options available for all Terraform providers such as alias and version, these provider-specific options can be used to instruct Terraform on how to interact with AWS. For example, how to authenticate to your AWS subscription, specify the region, or assume an IAM role.
From the Terraform docs, there are several ways to authenticate using the AWS provider. Configuration for the AWS Provider can be derived from several sources, which are applied in the following order:
Parameters in the provider configuration
Environment Variables
Shared credentials files
Shared configuration files
Container credentials
Instance profile credentials and region
We will demonstrate the most common methods of using parameters in the provider configuration and environment variables.
However, before we can authenticate, we will need to create an access key for use with Terraform. Browse to the IAM section in the AWS console and ‘create new access key’.
Browse to the IAM section in the AWS console and ‘create new access key’.

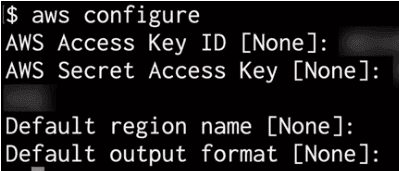
Note that the usual and recommended way to authenticate to AWS when using Terraform is via the AWS CLI, rather than any of the provider options listed above. To do this, first, install the AWS CLI, then type aws configure.

You can then enter your access key ID, secret access key, and default region.
Parameters in the provider configuration
To specify parameters in the provider configuration, we can set an access key and secret key as follows:
provider "aws" {
  region     = "us-west-2"
  access_key = "my-access-key"
  secret_key = "my-secret-key"
}
Note: This is NOT recommended! If your secrets are hardcoded into your configuration files and committed to source control, they may be compromised.
Similarly, we can specify a session access token, typically provided after a successful identity federation or Multi-Factor Authentication (MFA) login. With MFA login, this is the session token provided afterwards, not the 6-digit MFA code used to get temporary credentials.
provider "aws" {
  region = "us-west-2"
  token  = "my-token"
}
Environment Variables
To use the environment variables option to authenticate, credentials can be provided by using the AWS_ACCESS_KEY_ID, AWS_SECRET_ACCESS_KEY, and optionally AWS_SESSION_TOKEN environment variables. The region can be set using the AWS_REGION or AWS_DEFAULT_REGION environment variables.
In this case, the provider configuration options block would be empty, as the credentials needed for authentication are supplied at the system level (i.e., these are local to the system you are running Terraform from). This is safer than hardcoding your secrets and tokens in the configuration files.
provider "aws" {}
In the command shell, the environment variables are set as follows:
$ export AWS_ACCESS_KEY_ID="my-access-key"
$ export AWS_SECRET_ACCESS_KEY="my-secret-key"
$ export AWS_REGION="us-west-2"
Alternatively, a token can be used instead of Key ID and Access Key:
$ export AWS_SESSION_TOKEN="my-token"
This might be a useful option when running Terraform from a build agent in a CI/CD pipeline.
Assume an IAM role
Another useful use of the AWS Provider options is the ability to assume an IAM role. This is done using the role_arn option inside the assume_role block.
provider "aws" {
  assume_role {
    role_arn     = "arn:aws:iam::123456789012:role/ROLE_NAME"
    session_name = "SESSION_NAME"
    external_id  = "EXTERNAL_ID"
  }
}
In this article, I have shown the common uses of the Terraform AWS provider, showing how to authenticate using parameters in the provider configuration options and using environment variables.
Github Link:
https://github.com/SudipaDas/TerraWeek.git
If this post was helpful, please follow and click the 💚 button below to show your support.
_ Thank you for reading!
_Sudipa